
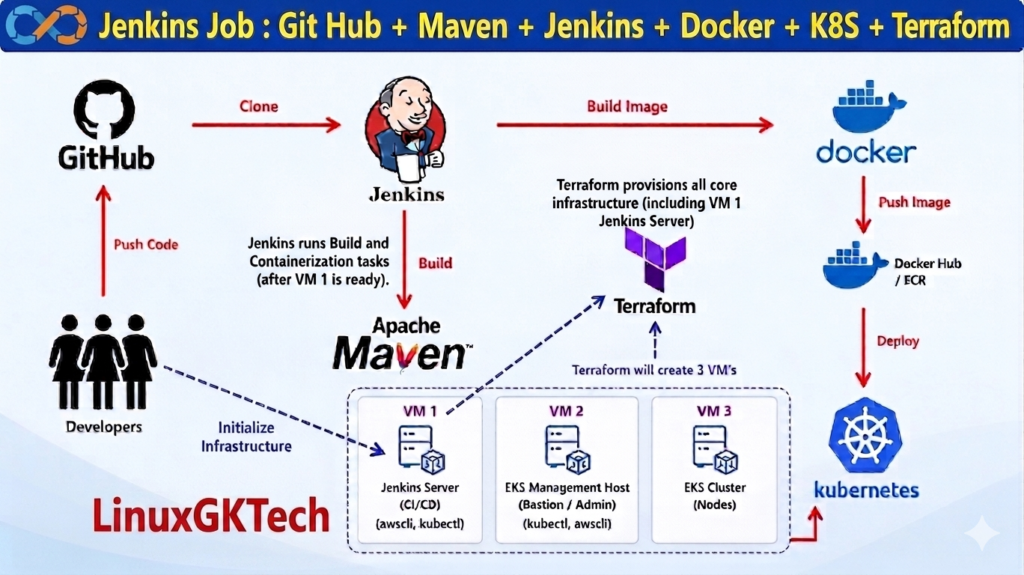

In this guide, I’ll walk you through a Real-Time Complete Kubernetes DevOps Project based on java that connects the entire developer lifecycle—from the first git commit to a running Kubernetes cluster.
The Architecture of the project
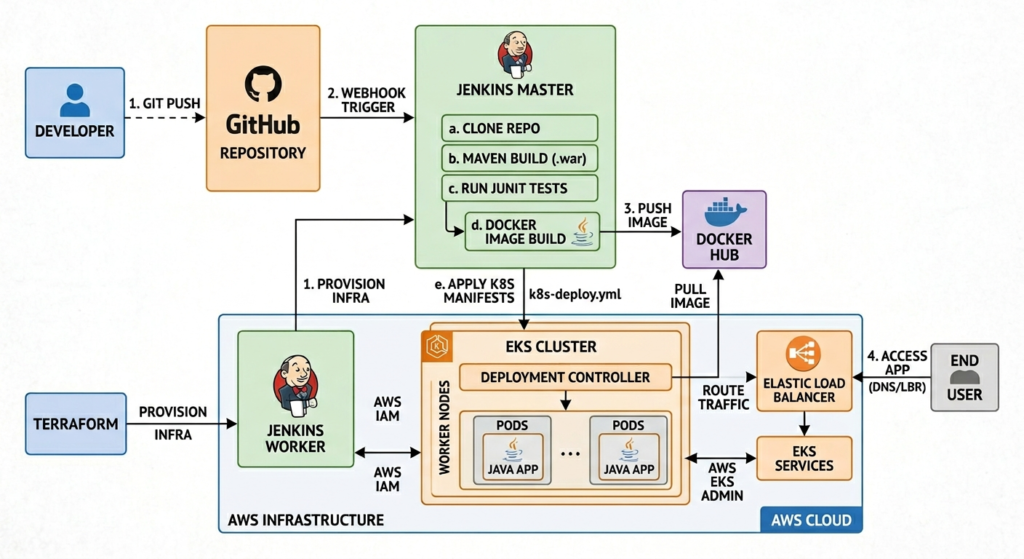
- Infrastructure Provisioning: Terraform handles the upfront work by creating your baseline AWS instances (like the Jenkins Host and Management Host). The Management Host then runs eksctl to spin up the managed AWS EKS Cluster.
- Code Commit: The developer pushes updated Java code to the GitHub repository.
- Pipeline Trigger: A GitHub webhook instantly alerts the Jenkins Server, kicking off the automation pipeline.
- Build & Package: Jenkins clones the code, uses Maven to compile it into a deployable package, and packages it inside a Docker image.
- Image Registry: Jenkins authentication keys are used to safely push the completed Docker image over to Docker Hub.
- Deployment: Jenkins runs kubectl apply -f k8s-deploy.yml. The EKS cluster pulls the freshly updated image directly from Docker Hub and rolls out the new pods.
- User Traffic: The AWS Load Balancer maps an external endpoint to the Kubernetes services so the end user can access the live Java application.
Prerequisites of this Java based DevOps Project
Before you begin the implementation, ensure you have the following accounts and access levels ready. This setup is the foundation of a successful automated pipeline.
1. Cloud & Account Requirements
AWS Account (Admin Access): You will need an AWS account with AdministratorAccess to provision EC2 instances, manage VPCs, and configure Security Groups.
Docker Hub Account: Access to a Docker Hub repository is required to push your built images and allow Kubernetes to pull them during deployment.
GitHub Repository: A repo containing your application code,
Dockerfile, and Kubernetes manifests.
2. Connectivity & Security (The “Handshakes”)
Security Groups: Jenkins: Inbound port 8080 (UI) and 22 (SSH).
K8s Cluster: Inbound port 6443 (API Server) and 30000-32767 (NodePort services).
Passwordless Authentication: Generate an SSH key on the Jenkins VM and use ssh-copy-id to send it to the Ansible and EKS MGT node servers.
If you want to know how to create SSH password less authentication then please refer my following article.Create-SSH-Key
Goal: This allows Jenkins to trigger Ansible playbooks and Ansible to deploy to K8s without human intervention.
List of tools that we will use in this Project
- Maven
- Terraform
- Git Hub
- Jenkins
- Docker & DockerHub
- Kubernetes
Step-by-Step Implementation:
Step -1 : Provision Infrastructure with Terraform
We will create 3 below VM’s using Terraform.
1. EKS Management Host
2. Jenkins Node
3. Ansible node
Terraform will install following packages on respective servers:
1. EKS Management Host: AWS CLI, eksctl, kubectl
2. Jenkins Node: Install Java (JDK 17+), Jenkins, and Git.
3. Ansible Node: Install Ansible and Docker.
Step -2 : Create IAM role & attach to EKS Management Host
- Go to AWS IAM
- Click Create Role
- Select use case: EC2
- Attach permission: AdministratorAccess
- Give role name: eksroleec2
- Attach role to your EC2 instance:
- Go to EC2
- Select instance
- Click Security
- Click Modify IAM Role
- Attach
eksroleec2
Step -3 : Create EKS Cluster using eksctl
Connect to EKS Management host using command ssh -i your-key.pem ubuntu@your-public-ip and run the following command.
Syntax:
eksctl create cluster \
–name cluster-name \
–region region-name \
–node-type instance-type \
–nodes-min 2 \
–nodes-max 2 \
–zones <AZ-1>,<AZ-2>
Create Cluster in Mumbai Region with one Worker node and custom VPC
eksctl create cluster \
  --name gk-cluster \
  --region ap-south-1 \
  --vpc-public-subnets subnet-02d482c2b34545393,subnet-05b95fa01ee69d575 \
  --node-type t3.small \
  --nodes 1 \
  --with-oidc
Note: Cluster creation will take 5 to 10 mins of time (we have to wait). After cluster created we can check nodes using below command.
kubectl get nodes
You also refer my previous article for How to Setup EKS cluster using eksctl
Step -4 : Jenkins Server Configuration Setup
Jenkins VM already created through the Terraform and also installed jenkins on this VM so now Open jenkins server in browser using VM public ip http://public-ip:8080/.
Connect Jenkins VM and copy content of /var/lib/jenkins/secrets/initialAdminPassword past it on Jenkins Dashboard in Administrative Password and click on continue and complete Setup.
Create Admin Account & Install Required Plugins in Jenkins.
Jenkins uses the SSH Agent to securely communicate with another VM’s for example Ansible, k8s, etc so install SSH Agent Plugin in Jenkins in following ways.
Jenkins-> Settings-> Plugin -> Available plugins-> Search ssh agent and install it.
Configure Maven as Global Tool in Jenkins in following ways.
Manage Jenkins -> Tools -> Maven Installation -> Add maven
Step -5: Adding Credentials in Jenkins
- Go to Manage Jenkins > Credentials > System > Global credentials > Add Credentials.
- For Docker Hub: Select Kind: secret text
- ID:
dockerhub(use this ID in your Groovy script).
- ID:
- For SSH (Ansible/K8s): Select Kind: SSH Username with private key.
- Enter the username (
ubuntu) and paste your private key (.pemfile content). - ID:
jenkin_ansible
- Enter the username (
Step -6: Webhooks Configuration.
To setup Webhooks on Github follow the below steps.
- Navigate to your repository Settings > Webhooks > Add webhook.
- Payload URL: Enter
http://<your-jenkins-ip>:8080/github-webhook/.- Crucial: The trailing slash
/is mandatory.
- Crucial: The trailing slash
- Content type: Select
application/json. - Events: Choose “Just the
pushevent” (or “Let me select individual events” if you want to trigger on Pull Requests). - Click Add webhook.
On Jenkins’ Side:
- Ensure the GitHub Plugin is installed.
- Go to your Job configuration.
- Under Build Triggers, check the box for GitHub hook trigger for GITScm polling
At this point make some changes in local repo and push to GitHub Repo. Github will send notification to Jenkins and Jenkins build will trigeer the job automatically.
Step -7 : Create Jenkins CI CD Job
- Stage-1 : Clone Git Repo
- Stage-2 : Maven Build
- Stage-3 : Create Docker Image
- Stage-4 : Push Docker Image to Registry
- Stage-5 : Deploy app in k8s eks cluster
pipeline {
    agent any
    tools{
        maven "Maven-3.9.9"
    }
    stages {
        stage('Clone Repo') {
            steps {
                git 'https://github.com/ashokitschool/maven-web-app.git'
            }
        }
        stage('Maven Build') {
            steps {
                sh 'mvn clean package'
            }
        }
        stage('Docker Image') {
            steps {
                sh 'docker build -t ashokit/mavenwebapp .'
            }
        }
        stage('k8s deployment') {
            steps {
                sh 'kubectl apply -f k8s-deploy.yml'
            }
        }
    }
}
Step -9 : Access Application in Browser
- We should be able to access our application
URL : http://LBR/context-path/
We are done with our Setup
After your practise, delete Cluster and other resources we have used in AWS Cloud to avoid billing
