

In the modern enterprise, “manual” is a four-letter word. To stay competitive, DevOps engineers must build systems that are self-healing, automated, and scalable. In this guide, I’ll walk you through a Real-Time Complete Kubernetes DevOps Project that connects the entire developer lifecycle—from the first git commit to a running Kubernetes cluster.
The Architecture
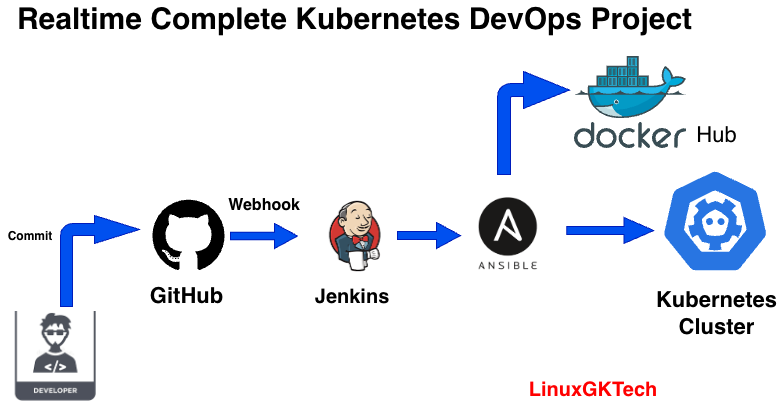
We are utilizing a best-in-class toolchain to move code through the pipeline seamlessly:
Developer (Commit): The process starts with a push to GitHub.
GitHub (Webhook): Triggers Jenkins immediately upon a new commit.
Jenkins (CI): Manages the lifecycle, builds, and tags Docker images.
Ansible (CD/Automation): Triggered by Jenkins to handle the deployment orchestration.
Docker Hub (Registry): Acts as the central storage for our container images.
Kubernetes Cluster: The final production environment where the application is served.
Prerequisites of DevOps Project
Before you begin the implementation, ensure you have the following accounts and access levels ready. This setup is the foundation of a successful automated pipeline.
1. Cloud & Account Requirements
AWS Account (Admin Access): You will need an AWS account with AdministratorAccess to provision EC2 instances, manage VPCs, and configure Security Groups.
Docker Hub Account: Access to a Docker Hub repository is required to push your built images and allow Kubernetes to pull them during deployment.
GitHub Repository: A repo containing your application code,
Dockerfile, and Kubernetes manifests.
2. Connectivity & Security (The “Handshakes”)
Security Groups: * Jenkins: Inbound port 8080 (UI) and 22 (SSH).
K8s Cluster: Inbound port 6443 (API Server) and 30000-32767 (NodePort services).
Passwordless Authentication: * Generate an SSH key on the Jenkins VM and use
ssh-copy-idto send it to the Ansible VM.Repeat this from the Jenkins VM to the Kubernetes and and Ansible to Kubernetes
- If you want to know how to create SSH password less authentication then please refer my following article.
ssh-key copy Goal: This allows Jenkins to trigger Ansible playbooks and Ansible to deploy to K8s without human intervention.
Install Docker Engine on Ubuntu
Step-by-Step Implementation of DevOps Project:
Step 1: Infrastructure Provisioning
Launch three EC2 instances (Ubuntu 24.04) on AWS:
Jenkins Server: (t2.medium) – Needs 4GB RAM for stable builds.
Ansible Server: (t2.micro) – Used for configuration management.
Minikube/K8s Server: (t3.medium) – Requires at least 2 vCPUs to run a Kubernetes cluster.
Step 2: Server Setup & Installations
Install the necessary tools on their respective servers:
Jenkins Node: Install Java (JDK 17+), Jenkins, and Git.
Ansible Node: Install Ansible and Docker.
Minikube Node: Install Docker, Minikube, and Kubectl.
Step 3: Create a Dockerfile and Push it to GitHub.
Create a Dockerfile in your local repository and add remot repo with following command.
git remote add origin git@github.com:LinuxGKTec/1st_DevOps_Project.git
Gautams-MacBook-Pro:1st_DevOps_project gautamkumar$ git remote -v
origin git@github.com:LinuxGKTec/1st_DevOps_Project.git (fetch)
origin git@github.com:LinuxGKTec/1st_DevOps_Project.git (push)
At this point we can push file from local machine to Github Repo with following commands.
git add Dockerfile
git commit -m "dockerfile"
git push origin main
Step 4: Transfer & Execute using SSH Agent
We use the SSH Agent plugin in Jenkins to securely transfer the Dockerfile and source code to the Ansible server. This keeps our pipeline secure and avoids hardcoding sensitive keys.
Jenkins needs “Auth” to talk to your servers and Docker Hub. You should never hardcode passwords; use the Credentials Manager.
Step: Adding Credentials
Go to Manage Jenkins > Credentials > System > Global credentials > Add Credentials.
For Docker Hub: Select Kind: Username with password.
ID:
dockerhub_pass(use this ID in your Groovy script).
For SSH (Ansible/K8s): Select Kind: SSH Username with private key.
Enter the username (
ubuntu) and paste your private key (.pemfile content).ID:
jenkin_ansible
In this stage, Jenkins uses the SSH Agent to securely communicate with the Ansible server.
Now install SSH Agent Plugin in Jenkins in following ways.
Jenkins-> Settings-> Plugin -> Available plugins-> Search ssh agent and install it.
Now it’s time to create a Jenkins job and you can do it in following ways:
Jenkis-> + New Item -> Put name of Item -> Select Pipeline -> OK
So at this stage we will create Pipeline script to Transfer Code to Ansible Node.
Now click on Newly created Item and then configured -> Script-> Pipeline syntax and create pipeline syntax by selecting sample steps.
node {
stage('Git Checkout'){
git branch: 'main', url: 'https://github.com/LinuxGKTec/1st_DevOps_Project.git'
}
stage('Transfer code from jenkins to ansible '){
sshagent(['jenkins_to_ansible']) {
sh 'ssh -o StrictHostKeyChecking=no ubuntu@10.0.1.57'
sh 'scp /var/lib/jenkins/workspace/k8s_app/Dockerfile ubuntu@10.0.1.57:/home/ubuntu'
}
}
}
At this point Jenkins will copy Dockerfile to ansible node in manual way.
Step 5: Webhooks Configuration.
To setup Webhooks on Github follow the below steps.
Navigate to your repository Settings > Webhooks > Add webhook.
Payload URL: Enter
http://<your-jenkins-ip>:8080/github-webhook/.Crucial: The trailing slash
/is mandatory.
Content type: Select
application/json.Events: Choose “Just the
pushevent” (or “Let me select individual events” if you want to trigger on Pull Requests).Click Add webhook.
On Jenkins’ Side:
Ensure the GitHub Plugin is installed.
Go to your Job configuration.
Under Build Triggers, check the box for GitHub hook trigger for GITScm polling
Now make some changes in Dockerfile and push to Repo and Jenkin build will start automatically.
Step 6: Build & Tag Docker Images
Jenkins executes a remote SSH command on the Ansible server to build the image. Once the files are on the Ansible node, we trigger the Docker build. We use dynamic variables like ${BUILD_ID} to ensure every image has a unique version.
Step 6: Push Images to Docker Hub
With the image built and tagged, we push it to the registry so it is accessible to the Kubernetes cluster.
To keep the pipeline secure, we use withCredentials to mask the Docker Hub password while pushing the newly created images to the registry.
Step 7: Kubernetes Deployment using Ansible
The final step of this DevOps Project is the orchestration. Jenkins first pushes the Kubernetes manifests (deployment.yml and service.yml) to the K8s node and then executes the Ansible playbook from Ansible node to deploy the Deployment and service on k8s node.
Conclusion
By combining Jenkins, Ansible, and Kubernetes, we’ve created a robust, scalable pipeline. This setup mirrors real-world production environments DevOps Project where speed and reliability are paramount.
Check out the full source code here: LinuxGKTec/1st_DevOps_Project
