


In this blog post, I have covered the step-by-step guide to setting up a kubernetes cluster using Kubeadm with one control plane node and two worker nodes.
What is Kubeadm?
Kubeadm is a tool to set up a minimum viable Kubernetes cluster without much complex configuration. Also, Kubeadm makes the whole process easy by running a series of prechecks to ensure that the server has all the essential components and configs to run Kubernetes. It is developed and maintained by the official Kubernetes community.
The kubeadm tool is good if you need:
- A simple way for you to try out Kubernetes, possibly for the first time.
- A way for existing users to automate setting up a cluster and test their application.
- A building block in other ecosystem and/or installer tools with a larger scope.
Kubeadm Setup Prerequisites
Following are the prerequisites for Kubeadm Kubernetes cluster setup.
- A compatible Linux host. The Kubernetes project provides generic instructions for Linux distributions based on Debian and Red Hat, and those distributions without a package manager.
- 2 GB or more of RAM per machine (any less will leave little room for your apps).
- 2 CPUs or more for control plane machines.
- Full network connectivity between all machines in the cluster (public or private network is fine).
- Unique hostname, MAC address, and product_uuid for every node.
- Certain ports are open on your machines so please refer to the following image and make sure all the ports are allowed for the control plane node and the worker nodes. If you are setting up the kubeadm cluster cloud servers, ensure you allow the ports in the firewall configuration.
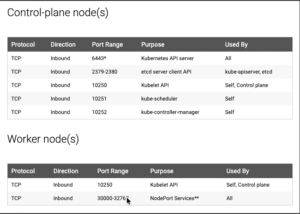
See here for more details.
Note: If you are setting up the cluster in the corporate network behind a proxy, ensure set the proxy variables and have access to the container registry and docker hub. Or talk to your network administrator to whitelist registry.k8s.io to pull the required images.
Kubernetes Cluster Setup Using Kubeadm
The following are the high-level steps involved in setting up a kubeadm-based Kubernetes cluster.
- Install container runtime on all nodes. We will be using containerd
- Install Kubeadm, Kubelet, and kubectl on all the nodes.
- Initiate Kubeadm control plane configuration on the control plane node.
- Save the node join command with the token.
- Install the Weave net plugin (operator).
- Join the worker node to the control plane node using the join command.
- Validate all cluster components and nodes.
- Deploy a sample app in Kubernetes Cluster and validate the app
All the steps given in this guide are referenced from the official Kubernetes documentation.
Step 1: Enable iptables Bridged Traffic on all the Nodes
Execute the following commands on all the nodes for IPtables to see bridged traffic. Here we are tweaking some kernel parameters and setting them using sysctl.
cat <<EOF | sudo tee /etc/modules-load.d/k8s.conf
overlay
br_netfilter
EOF

sudo modprobe overlay
sudo modprobe br_netfilter

# sysctl params required by setup, params persist across reboots
cat <<EOF | sudo tee /etc/sysctl.d/k8s.conf
net.bridge.bridge-nf-call-iptables  = 1
net.bridge.bridge-nf-call-ip6tables = 1
net.ipv4.ip_forward                 = 1
EOF

# Apply sysctl params without reboot
sudo sysctl --system
Step 2: Disable swap on all the Nodes
For kubeadm to work properly, you need to disable swap on all the nodes.
To disable swap, sudo swapoff -a can be used to disable swapping temporarily. To make this change persistent across reboots, make sure swap is disabled in config files like /etc/fstab, systemd.swap, depending how it was configured on your system.
Step 3: Install containerd Runtime On All The Nodes
The basic requirement for a Kubernetes cluster is a container runtime. You need to install a container runtime into each node in the cluster so that Pods can run there.
You can have any one of the following container runtimes.
- CRI-O
- containerd
- Docker Engine (using cri-dockerd)
We will be using containerd instead of Docker for this Kubernetes Cluster setup.
Execute the following commands on all the nodes to install required dependencies and the latest version of containerd .
sudo apt-get update
sudo apt-get install ca-certificates curl gnupg
sudo install -m 0755 -d /etc/apt/keyrings
curl -fsSL https://download.docker.com/linux/ubuntu/gpg | sudo gpg --dearmor -o /etc/apt/keyrings/docker.gpg
sudo chmod a+r /etc/apt/keyrings/docker.gpg

echo "deb [arch=$(dpkg --print-architecture) signed-by=/etc/apt/keyrings/docker.gpg] https://download.docker.com/linux/ubuntu $(. /etc/os-release && echo "$VERSION_CODENAME") stable" | sudo tee /etc/apt/sources.list.d/docker.list > /dev/null
sudo apt-get update
sudo apt-get install containerd.io

sudo systemctl daemon-reload
sudo systemctl enable containerd --now
sudo systemctl start containerd.service

echo "Containerd runtime installed successfully"

# Generate the default containerd configuration
sudo containerd config default | sudo tee /etc/containerd/config.toml
Step 4: Install & Configure Crictl to use Containerd
Download and install Crictl on all nodes and configure it to use the containerd runtime.
# Set version and ARCH
CRICTL_VERSION="v1.36.0"
ARCH="arm64"
# Download the ARM version
curl -fLO “https://github.com/kubernetes-sigs/cri-tools/releases/download/${CRICTL_VERSION}/crictl-${CRICTL_VERSION}-linux-${ARCH}.tar.gz”
# Extract
sudo tar zxvf crictl-${CRICTL_VERSION}-linux-${ARCH}.tar.gz -C /usr/local/bin
# Remove tar file
sudo rm -f “crictl-${CRICTL_VERSION}-linux-${ARCH}.tar.gz”
# Download the AMD Version
curl -LO https://github.com/kubernetes-sigs/cri-tools/releases/download/${CRICTL_VERSION}/crictl-${CRICTL_VERSION}-linux-amd64.tar.gz
# Extract
sudo tar zxvf crictl-${CRICTL_VERSION}-linux-amd64.tar.gz -C /usr/local/bin
# Remove tar file
rm -f crictl-${CRICTL_VERSION}-linux-amd64.tar.gz
# Configure crictl to use Containerd socket
cat <<EOF | sudo tee /etc/crictl.yaml
runtime-endpoint: unix:///run/containerd/containerd.sock
image-endpoint: unix:///run/containerd/containerd.sock
timeout: 10
debug: false
EOF
#After updating the file, restart containerd to be sure the service is actually “listening”:
sudo systemctl restart containerd
# Test
sudo crictl –version
Now you will also have crictl available in your nodes.
crictl is a CLI utility to interact with the containers created by the container runtime. When you use container runtimes other than Docker, you can use the crictl utility to debug containers on the Kubernetes Cluster.
Step 5: Configuring the systemd cgroup drive
On Linux, Control groups are used to constrain resources that are allocated to processes. Both the kubelet and the underlying container runtime need to interface with control groups to enforce resource management for pods and containers and set resources such as cpu/memory requests and limits. To interface with control groups, the kubelet and the container runtime need to use a cgroup driver. It’s critical that the kubelet and the container runtime use the same cgroup driver and are configured the same.
There are two cgroup drivers available:
• cgroupfs
• systemd
cgroupfs driver
The cgroupfs driver is the default cgroup driver in the kubelet. When the cgroupfs driver is used, the kubelet and the container runtime directly interface with the cgroup filesystem to configure cgroups.
The cgroupfs driver is not recommended when systemd is the init system because systemd expects a single cgroup manager on the system.
systemd cgroup driver
When systemd is chosen as the init system for a Linux distribution, the init process generates and consumes a root control group (cgroup) and acts as a cgroup manager.
systemd has a tight integration with cgroups and allocates a cgroup per systemd unit. As a result, if you use systemd as the init system with the cgroupfs driver, the system gets two different cgroup managers.
Two cgroup managers result in two views of the available and in-use resources in the system. In some cases, nodes that are configured to use cgroupfs for the kubelet and container runtime, but use systemd for the rest of the processes become unstable under resource pressure.
The approach to mitigate this instability is to use systemd as the cgroup driver for the kubelet and the container runtime when systemd is the selected init system. To enable systemd cgroup driver run the followings command on all nodes.
# Enable SystemdCgroup

sudo sed -i 's/SystemdCgroup = false/SystemdCgroup = true/g' /etc/containerd/config.toml

# Restart containerd to apply changes
sudo systemctl restart containerd
Step 6: Install Kubeadm & Kubelet & Kubectl on all Nodes
You will install these packages on all of your machines:
kubeadm: the command to bootstrap the cluster.kubelet: the component that runs on all of the machines in your cluster and does things like starting pods and containers.kubectl: the command line util to talk to your cluster.
Update the apt package index and install packages needed to use the Kubernetes apt repository:
sudo apt-get update
# apt-transport-https may be a dummy package; if so, you can skip that package
sudo apt-get install -y apt-transport-https ca-certificates curl gpg
Download the GPG key for the Kubernetes APT repository on all the nodes.
KUBERNETES_VERSION=v1.36

curl -fsSL https://pkgs.k8s.io/core:/stable:/$KUBERNETES_VERSION/deb/Release.key | sudo gpg --dearmor -o /etc/apt/keyrings/kubernetes-apt-keyring.gpg

echo "deb [signed-by=/etc/apt/keyrings/kubernetes-apt-keyring.gpg] https://pkgs.k8s.io/core:/stable:/$KUBERNETES_VERSION/deb/ /" | sudo tee /etc/apt/sources.list.d/kubernetes.list
Update apt repo
sudo apt-get update -yYou can use the following commands to find the latest versions. Install the first version in 1.35 so that you can practice the cluster upgrade task.
apt-cache madison kubeadm | tacSpecify the version as shown below. Here I am using 1.36.0-1.1
KUBERNETES_INSTALL_VERSION="1.36.0-1.1"

sudo apt-get install -y kubelet="$KUBERNETES_INSTALL_VERSION" kubectl="$KUBERNETES_INSTALL_VERSION" kubeadm="$KUBERNETES_INSTALL_VERSION"
Or, to install the latest version from the repo use the following command without specifying any version.
sudo apt-get install -y kubelet kubeadm kubectlAdd hold to the packages to prevent upgrades.
sudo apt-mark hold kubelet kubeadm kubectlNow we have all the required utilities and tools for configuring Kubernetes components using kubeadm.
Step 7: Initialize Kubeadm On Controlplane Node
The control-plane node is the machine where the control plane components run, including etcd (the cluster database) and the API Server (which the kubectl command line tool communicates with).
- (Recommended) If you have plans to upgrade this single control-plane
kubeadmcluster to high availability you should specify the--control-plane-endpointto set the shared endpoint for all control-plane nodes. Such an endpoint can be either a DNS name or an IP address of a load-balancer. - Choose a Pod network add-on, and verify whether it requires any arguments to be passed to
kubeadm init. Depending on which third-party provider you choose, you might need to set the--pod-network-cidrto a provider-specific value. - (Optional)
kubeadmtries to detect the container runtime by using a list of well known endpoints. To use different container runtime or if there are more than one installed on the provisioned node, specify the--cri-socketargument tokubeadm.
To initialize the control-plane node run:
sudo kubeadm init --apiserver-advertise-address=<private-ip-of-control-plane> --pod-network-cidr=10.32.0.0/12--apiserver-advertise-address can be used to set the advertised address for this particular control-plane node’s API server,
--control-plane-endpoint can be used to set the shared endpoint for all control-plane nodes.
--pod-network-cidr We will use Weave Net Network Plugin and By default, Weave Net uses 10.32.0.0/12 as its internal pod network. If you want to use a different range then you need to edit Weave Net YAML before applying it.
kubeadm init first runs a series of prechecks to ensure that the machine is ready to run Kubernetes. These prechecks expose warnings and exit on errors. kubeadm init then downloads and installs the cluster control plane components. This may take several minutes. After it finishes you should see:
Your Kubernetes control-plane has initialized successfully!

To start using your cluster, you need to run the following as a regular user:

  mkdir -p $HOME/.kube
  sudo cp -i /etc/kubernetes/admin.conf $HOME/.kube/config
  sudo chown $(id -u):$(id -g) $HOME/.kube/config

You should now deploy a Pod network to the cluster.
Run "kubectl apply -f [podnetwork].yaml" with one of the options listed at:
  /docs/concepts/cluster-administration/addons/

You can now join any number of machines by running the following on each node
as root:

  kubeadm join <control-plane-host>:<control-plane-port> --token <token> --discovery-token-ca-cert-hash sha256:<hash>
To make kubectl work for your non-root user, run these commands, which are also part of the kubeadm init output:
mkdir -p $HOME/.kube
sudo cp -i /etc/kubernetes/admin.conf $HOME/.kube/config
sudo chown $(id -u):$(id -g) $HOME/.kube/config
Warning:
The kubeconfig file admin.conf that kubeadm init generates contains a certificate with Subject: O = kubeadm:cluster-admins, CN = kubernetes-admin. The group kubeadm:cluster-admins is bound to the built-in cluster-admin ClusterRole. Do not share the admin.conf file with anyone.
kubeadm init generates another kubeconfig file super-admin.conf that contains a certificate with Subject: O = system:masters, CN = kubernetes-super-admin. system:masters is a break-glass, super user group that bypasses the authorization layer (for example RBAC). Do not share the super-admin.conf file with anyone. It is recommended to move the file to a safe location.
Step 8: Installing Weave Net
Network Plugin for Pod Networking
You must deploy a Container Network Interface (CNI) based Pod network add-on so that your Pods can communicate with each other. Cluster DNS (CoreDNS) will not start up before a network is installed.
Kubeadm does not configure any network plugin. You need to install a network plugin of your choice for kubernetes pod networking and enable network policy.
I am using the Weave Net network plugin for this setup. You can refer the following Weave Net official Repo to configure it.
On a newly created Kubernetes cluster, the Weave Net CNI pluging can be installed by running the following command:
kubectl apply -f https://reweave.azurewebsites.net/k8s/v1.36/net.yamlReplace v1.36 with the version on Kubernetes on your cluster.
Step 9: Join Worker node in Cluster
You can now join any number of machines in Kubernetes Cluster by running the following on each node as root:
kubeadm join <control-plane-host>:<control-plane-port> --token <token> --discovery-token-ca-cert-hash sha256:<hash>
Now you can followings command on control plane node to verify cluster status.
kubectl get nodes
kubectl get pods -A
Step 10: Deploy A Sample Nginx Application in Newly Created Kubernetes Cluster
Now that we have all the components to make the Kubernetes Cluster and applications work, let’s deploy a sample Nginx application and see if we can access it over a NodePort.
Create an Nginx deployment. Execute the following directly on the command line. It deploys the pod in the default namespace.
cat <<EOF | kubectl apply -f -
apiVersion: apps/v1
kind: Deployment
metadata:
  name: nginx-deployment
spec:
  selector:
    matchLabels:
      app: nginxapp
  replicas: 2
  template:
    metadata:
      labels:
        app: nginxapp
    spec:
      containers:
      - name: nginxc
        image: nginx
        ports:
        - containerPort: 80
EOF
Expose the Nginx deployment on a NodePort 32000
cat <<EOF | kubectl apply -f -
apiVersion: v1
kind: Service
metadata:
  name: nginxapp-service
spec:
  selector:
    app: nginxapp
  type: NodePort
  ports:
    - port: 80
      targetPort: 80
      nodePort: 32000
EOF
Check the pod status using the following command.
kubectl get podsOnce the deployment is up, you should be able to access the Nginx home page on the allocated NodePort.
How Does Kubeadm Work?
Here is how the Kubeadm setup works.
When you initialize a Kubernetes cluster using Kubeadm, it does the following.
- When you initialize kubeadm, first it runs all the preflight checks to validate the system state and it downloads all the required cluster container images from the registry.k8s.io container registry.
- It then generates required TLS certificates and stores them in the /etc/kubernetes/pki folder.
- Next, it generates all the kubeconfig files for the cluster components in the /etc/kubernetes folder.
- Then it starts the kubelet service generates the static pod manifests for all the cluster components and saves it in the /etc/kubernetes/manifests folder.
- Next, it starts all the control plane components from the static pod manifests.
- Then it installs core DNS and Kubeproxy components
- Finally, it generates the node bootstrap token.
- Worker nodes use this token to join the control plane.
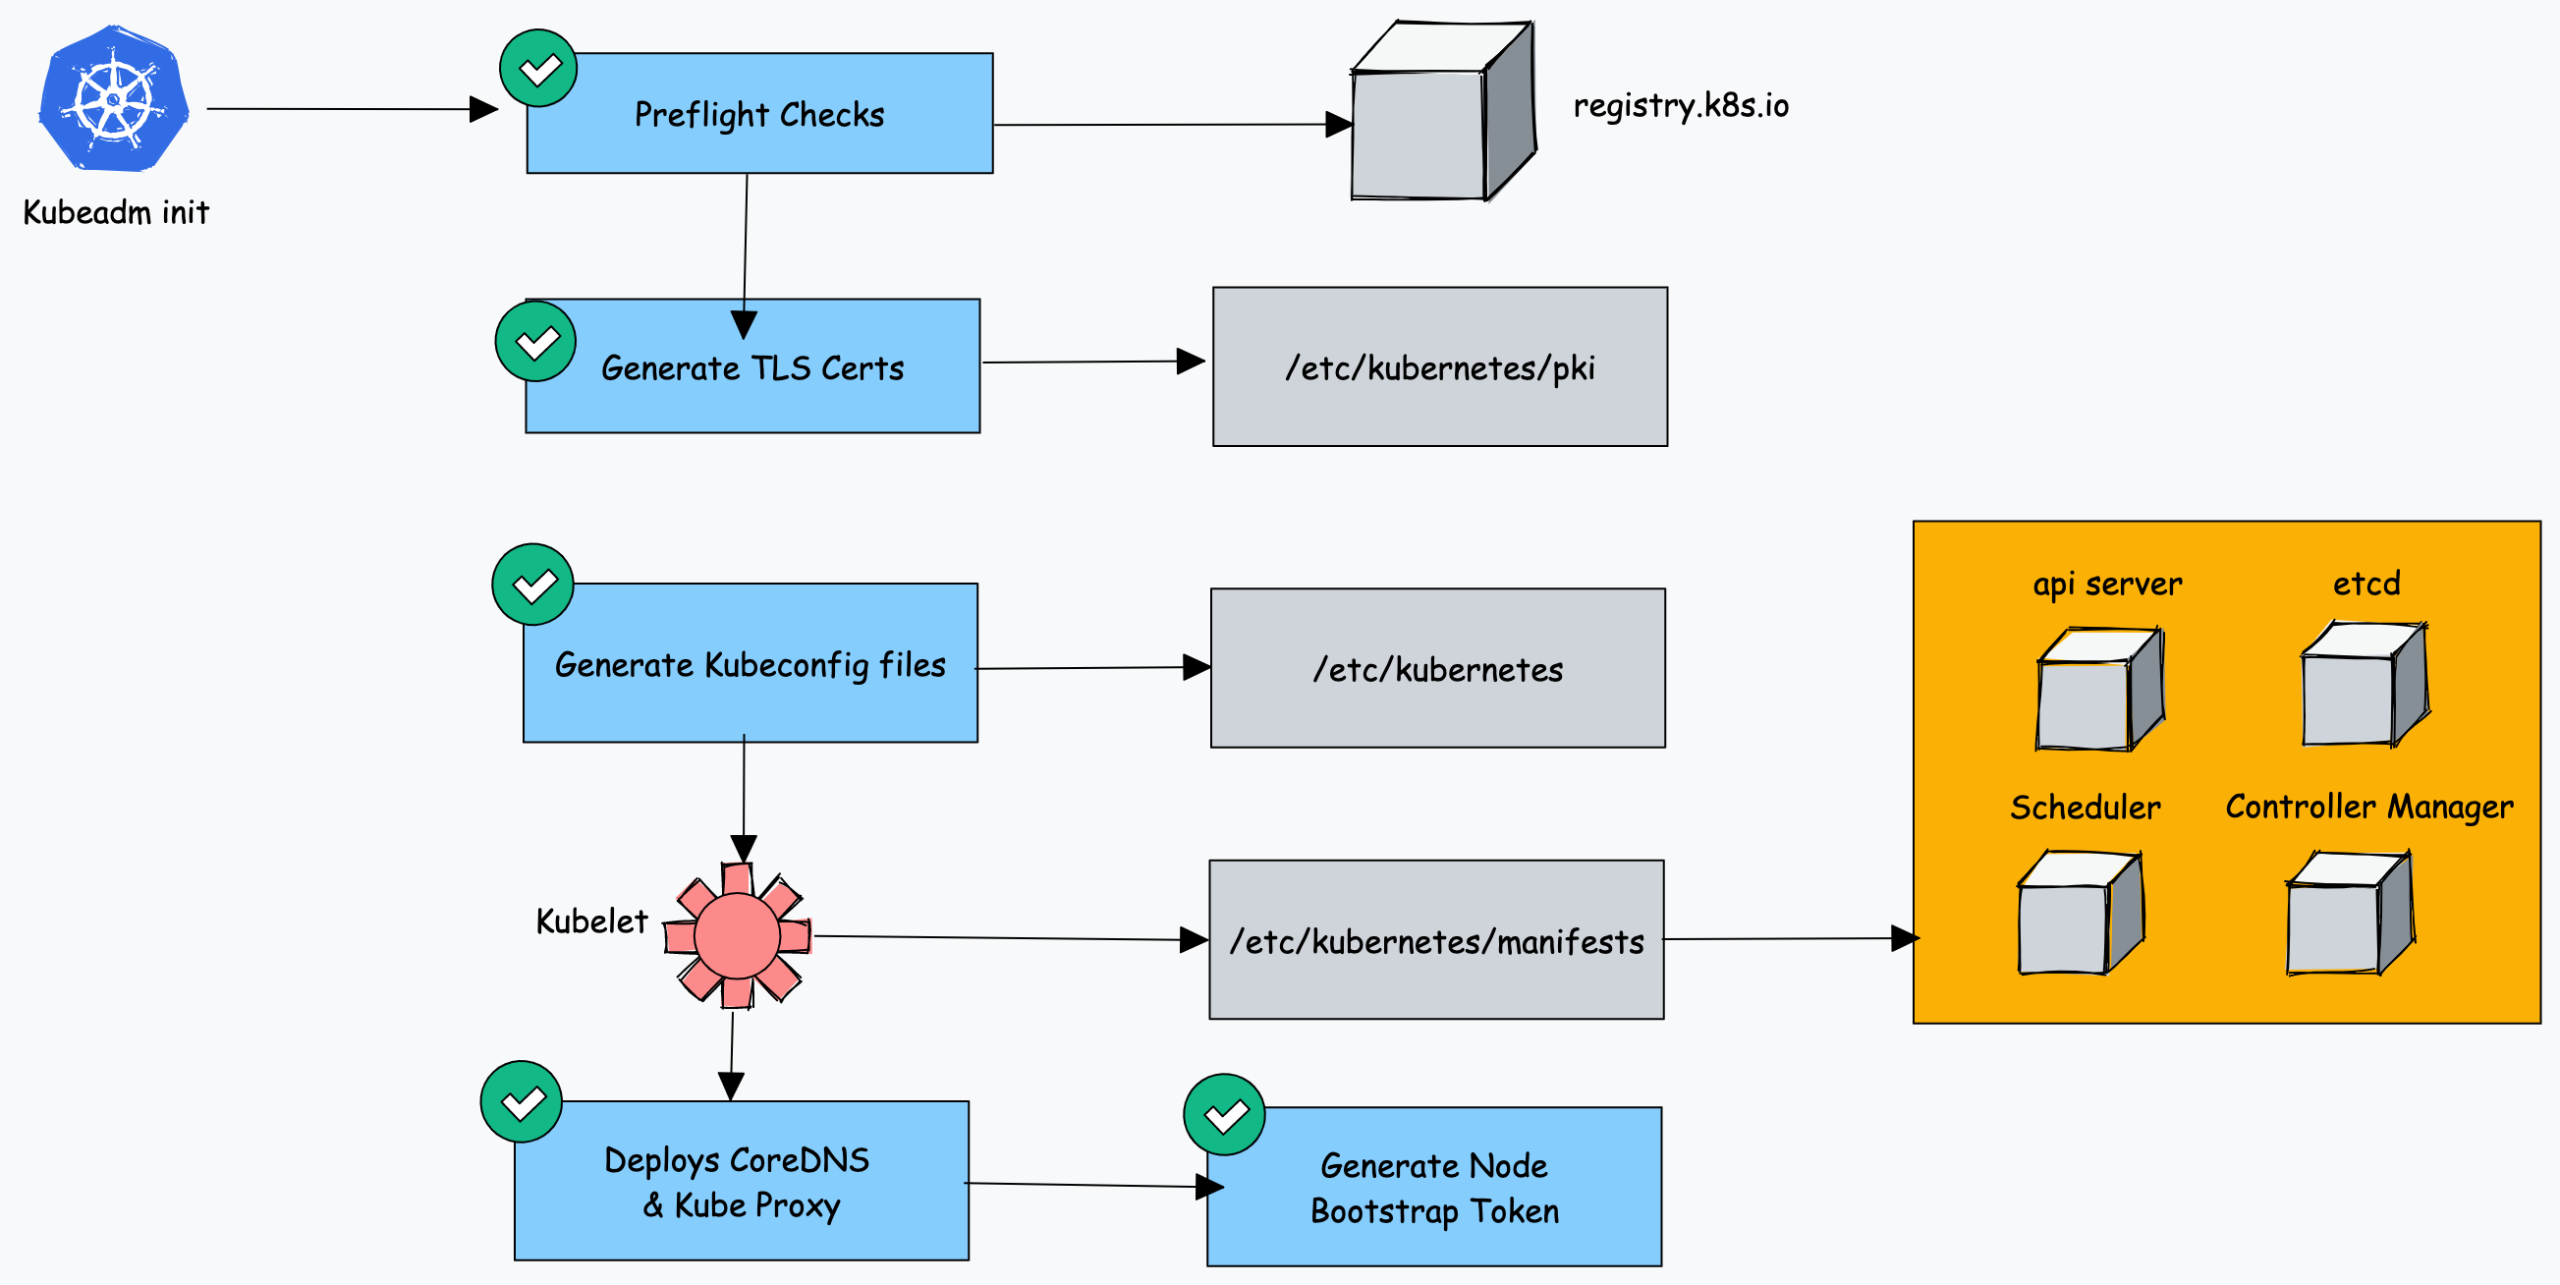
As you can see all the key cluster configurations will be present under the /etc/kubernetes folder.
You can refer my another article for how-to-setup-aws-eks-cluster on AWS.
You can also view my post on Real-Time k8s DevOps Project: A Complete CI/CD Pipeline on AWS
