

Table of Contents
How to Set Up AWS EKS Cluster Using eksctl:
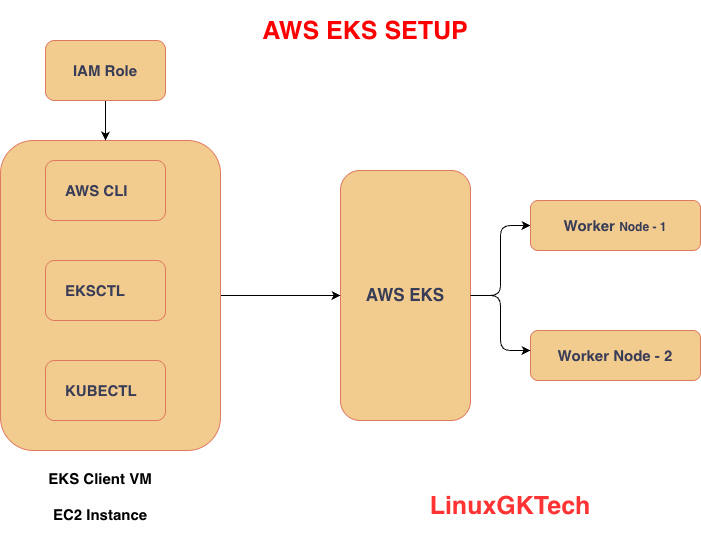
Amazon Elastic Kubernetes Service (AWS EKS) makes it easy to run Kubernetes on AWS without managing the control plane manually.
In this guide, we will learn how to:
-
Create an EC2 management host
-
Install required tools (
kubectl, AWS CLI,eksctl) -
Configure IAM role
-
Create an EKS cluster
-
Add worker nodes
-
Verify the cluster
-
Delete resources to avoid billing
Prerequisites
Before starting, make sure you have:
-
AWS account
-
Basic knowledge of EC2 and IAM
-
Access to AWS console
-
SSH client to connect to EC2 instance
Step 1: Create an AWS EKS Management Host
Launch a new Ubuntu EC2 instance that will act as your management machine.
Launch EC2 Instance
-
Go to AWS Console → EC2
-
Launch a new instance
-
Select Ubuntu
-
Choose instance type:
t2.micro -
Configure security group to allow SSH access
-
Launch instance
Step 2: Connect to EC2 Instance
SSH into your EC2 instance:
ssh -i your-key.pem ubuntu@your-public-ip
Step 3: Install kubectl
Install Kubernetes CLI tool:
curl -o kubectl https://amazon-eks.s3.us-west-2.amazonaws.com/1.19.6/2021-01-05/bin/linux/amd64/kubectl

chmod +x ./kubectl

sudo mv ./kubectl /usr/local/bin

kubectl version --short --client
You can also visit K8s official website Install and Set Up kubectl on Linuxto for how to install kubectl.
Step 4: Install AWS CLI
Install latest AWS CLI:
sudo apt update
sudo apt install unzip -y

curl "https://awscli.amazonaws.com/awscli-exe-linux-x86_64.zip" -o "awscliv2.zip"

unzip awscliv2.zip

sudo ./aws/install

aws --version
Step 5: Install eksctl
Install eksctl utility:
curl --silent --location "https://github.com/weaveworks/eksctl/releases/latest/download/eksctl_$(uname -s)_amd64.tar.gz" | tar xz -C /tmp

sudo mv /tmp/eksctl /usr/local/bin

eksctl version
Step 6: Create IAM Role for EC2
-
Go to AWS IAM
-
Click Create Role
-
Select use case: EC2
-
Attach permission:
AdministratorAccess
-
Give role name:
eksroleec2
-
Attach role to your EC2 instance:
-
Go to EC2
-
Select instance
-
Click Security
-
Click Modify IAM Role
-
Attach
eksroleec2
Step 7: Create AWS EKS Cluster
Use the following command syntax:
eksctl create cluster \
--name cluster-name \
--region region-name \
--node-type instance-type \
--nodes-min 2 \
--nodes-max 2 \
--zones <AZ-1>,<AZ-2>
Create Cluster in Mumbai Region with one Worker node and custom VPC
eksctl create cluster \
  --name gk-cluster \
  --region ap-south-1 \
  --vpc-public-subnets subnet-02d482c2b34545393,subnet-05b95fa01ee69d575 \
  --node-type t3.small \
  --nodes 1 \
  --with-oidc
Wait for Cluster Creation Cluster creation usually takes 10–15 minutes.
Once completed, verify nodes:
kubectl get nodes
Expected output:
NAME              STATUS   ROLES    AGE   VERSION
ip-xxx-xxx-xxx    Ready    <none>   5m    v1.xx
Step 8: Add Worker Nodes to Existing AWS EKS Cluster
If you want to scale your cluster by adding more worker nodes:
eksctl scale nodegroup \
  --cluster=my-eks-cluster \
  --nodes=4 \
  --name=ng-1
This command increases the number of worker nodes to 4.
Create a New Node Group
You can also create a completely new worker node group:
eksctl create nodegroup \
  --cluster=my-eks-cluster \
  --name=new-workers \
  --node-type=t2.medium \
  --nodes=2 \
  --nodes-min=2 \
  --nodes-max=4
Verify:
kubectl get nodes
Step 9: Deploy Test Application (Optional)
Deploy nginx application:
kubectl create deployment nginx --image=nginx
Expose service:
kubectl expose deployment nginx --port=80 --type=LoadBalancer
Check services:
kubectl get svc
Step 10: Delete EKS Cluster to Avoid Billing
After practice, delete all resources:
eksctl delete cluster \
--name my-eks-cluster \
--region ap-south-1
Conclusion
Using eksctl, setting up an AWS EKS cluster becomes much easier because AWS automatically creates:
-
VPC
-
Subnets
-
Security Groups
-
Worker Nodes
-
IAM Roles
-
Kubernetes Control Plane
This is one of the fastest ways to get started with Kubernetes on AWS.
You can check Real-Time Complete Kubernetes DevOps Project

1 thought on “How to Setup AWS EKS Cluster: Step by Step Easy Guide for Beginners”
Pingback: DevOps Real time Java based project - LinuxGKTech